Food is an essential part of day-to-day life. So with agriculture, we can cultivate the plant and made food for a living. We have a very long history of farming techniques and tools we are able to make development in agriculture. The age of information technology can contribute new technology for farming solutions.
And the answer is yes, Using the Smart Farming solution we can enable IoT solution can be part of Agriculture development.
Why IoT solution?
With the Internet of Things solution, we can use the new technology solution in the farming field.
1. Gather the weather information using the weather sensor in the farm environment.
2. Use an IoT sensor to collect and analyze get the health parameters from the soil.
3. Farm data analysis using Cloud Technology for precious agriculture.
2. Use an IoT sensor to collect and analyze get the health parameters from the soil.
3. Farm data analysis using Cloud Technology for precious agriculture.
4. Automation for the Irrigation system and fertilization via Drone.
There are a few solutions we can implement using the IoT concept.
- Checking garden weather using IoT sensors.
- The moisture level of soil for smart irrigation.
So let's do a small interesting project where we will monitor the weather forecast for our gardening with IoT Platform. Then use some of the sensors to collect the moisture level of soil so that we can check the water requirement for the garden.
Hardware Required:
1. ESP8266 NodeMCU
2. DHT sensor.
3. Moisture Sensor.
Software Required:
1. Arduino
2. Adafruit IO dashboard tool
Introduction:
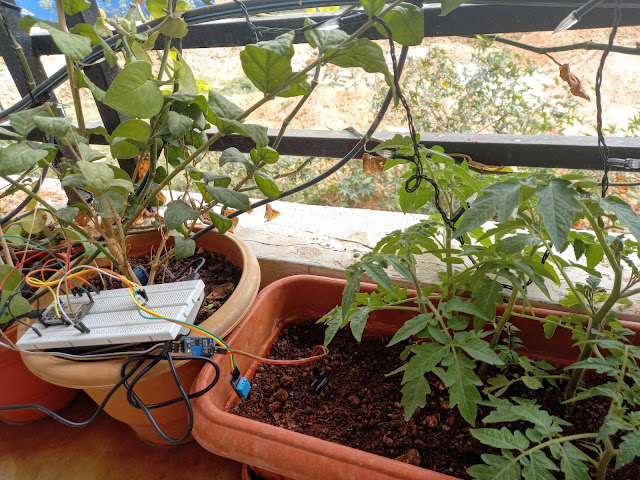
This is my setup where I have used a smart gardening solution using IoT. Here we are using the embedded microcontroller to collect the weather and soil information using the attached sensor. This microcontroller is ESP8266 Nodemcu which runs on a small battery voltage of 5 V. So can be attached to the power bank with a supported voltage range.
This setup will have one DHT sensor which will get the Temperature and Humidity date around the plant. and another Moisture sensor that is inserted into the soil will get the moisture level of the soil, which then used to indicate whether the plant needs water or not.
 |
This sensor information can be collected by a microcontroller can be sent over to internet service, where we can monitor the garden's health using a mobile device from anywhere.
This is a dashboard from the Adafruit IO service. IO - Smart Garden (adafruit.com) which will show the live feed information from the home garden.
So now let's being with how this has been done step by step procedure.
ESP8266 NodeMCU :
The ESP8266 NodeMCU has a total of 30 pins that interface it to the outside world. The connections are as follows:
ESP8266 NodeMCU is a single-board microcontroller and low-cost open-source IoT platform. NodeMCU included firmware that runs on the ESP8266 Wi-Fi SoC from Espressif Systems. ESP8266 is a bite-sized and low const WiFi-enabled microcontroller, it can monitor and control things from anywhere in the world and it just perfect for just about any IoT project.
Specification of ESP866 NodeMCU:
- ESP-12E Chip Tensilica Xtensa® 32-bit LX106
- 80 to 160 MHz Clock Freq.
- 128kB internal RAM.
- 4MB external flash.
- 802.11b/g/n Wi-Fi transceiver ()
Power to the ESP8266 NodeMCU is supplied via the on-board MicroB USB connector. Alternatively, if you have a regulated 5V voltage source, the VIN pin can be used to directly supply the ESP8266 and its peripherals.
The ESP8266 NodeMCU has a total of 30 pins that interface it to the outside world. The connections are as follows:
Sketch Diagram:
The below diagram shows the complete circuit connection for setting up the project.
The below diagram shows the complete circuit connection for setting up the project.
You can download the sketch from the My GitHub Repository.
Once the connection is established we can connect ESP8266 Nodemcu using the USB connection.
Setting ESP8266 NodeMCU configuration using Arduino:
You can use the Arduino software to connect and configure the ESP8266. Arduino is IDE for software development for the microcontroller, which will enable us to program and run the program on a microcontroller without an easy interface.
To configure and setup ESP8266 we need to download and install the Arduino software. Please download and install the Arduino software from the link Arduino Software.
Click on the Highlighted portion to download the window installer. Open the downloaded installer and install the Arduino software with system admin settings. Once you successfully install Arduino you will be able to open Arduino Application from the start menu.
Once you installed the IDE successfully open the Arduino program from the start menu. Connect your ESP8255 Nodemcu microcontroller board to PC using USB-Serail Port. The matching COM port will be shown in Ardunio SOftware when you connect the ESP8266 Nodemcu with the PC using USB-Serial Cable.
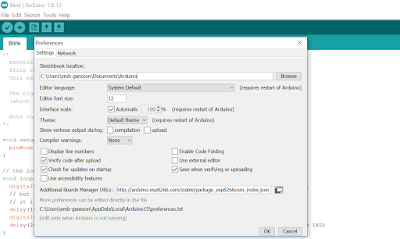
Now you need to install the ESP8266 Board Package.
- Add link http://arduino.esp8266.com/stable/package_esp8266com_index.json into Additional Board Manager URLs field in the Arduino preferences.
- Open Board manager to install the ESP8266 package. [Tools --> Board (esp8266 Module) -> Board Manager]. Make sure your ESP8266 is connected to PC using USB cable.
- Install ESP8266 Nodemcu library using the "esp8266" key in the search bar.
- After the install process, you should see that the esp8266 package is marked INSTALLED.
Now we need to install the Adafruit MQTT library which will help in connecting the ESP8266 device to the Adafruit IO service Platform. To install the library we need to open the library manager
- Go to Libary Manager. with path [Tools --> Manager Libraries -> Libary Manager].
- Install the "Adafruit MQTT Library" Library using the below search key "Adafruit MQTT Library" in the search bar.
- Close the Boards Manager window once the Libary installed successfully.
Blink Test :
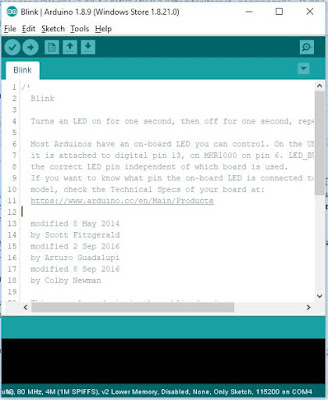
We'll begin with the simple blink test so it will make sure that our connection to the ESP8266 board is correct and working fine.
void setup() {
  pinMode(LED_BUILTIN, OUTPUT);     // Initialize the LED_BUILTIN pin as an output
}
// the loop function runs over and over again forever
void loop() {
  digitalWrite(LED_BUILTIN, LOW);   // Turn the LED on (Note that LOW is the voltage level
  // but actually the LED is on; this is because
  // it is active low on the ESP-01)
  delay(1000);                      // Wait for a second
  digitalWrite(LED_BUILTIN, HIGH);  // Turn the LED off by making the voltage HIGH
  delay(2000);                      // Wait for two seconds (to demonstrate the active low LED)
}
Build and upload the code to the connected ESP8266 Microcontroller.
Once successful upload ESP8266 will start blinking its LED with a delay of 1 sec.
Adafruit IO Service:
Now we have configured ESP8288 with Arduino software we are ready for the next step to create a service using the Adafruit IO service. Adafruit IO is the easiest way to get your projects onto the Internet of Things.
Using the Adafruit IO service you can connect your device our the internet service. Adafruit IO uses MQTT (message queue telemetry transport) as a transport protocol for device communication that Adafruit IO supports.
Create the account and user login credentials you can able to access the IO service by creating the dashboard which will display your sensor data feed with graphical representation.
Adafruit IO: Feeds
Feeds are the core of Adafruit IO which takes part in exacting data communication to and from Adafruit IO service. This feed data can be used to control the sensor device using a microcontroller device like ESP8266. Using an MQTT library or client you can publish and subscribe to a feed to send and receive feed data. you can read more from the Adafruit IO site on how to create, edit, and delete your very own feed.
The second part is Dashboards allow you to visualize and control Adafruit IO connected projects from any modern web browser. Widgets such as charts, sliders, and buttons are available to help you quickly get your project up and running without the need for any custom code.
Click on New Dashboard to create your own dashboard to add the sensor feed for garden data.
To use the Adafruit service over the internet we need a few connection details when establishing the connection to the Adafruit IO service. use the following details to connect an MQTT client to Adafruit IO:
- Host: io.adafruit.com
- Port: 1883 or 8883 (for SSL encrypted connection)
- Username: your Adafruit account username (see the accounts.adafruit.com page here to find yours)
- Password: your Adafruit IO key (click the AIO Key button on a dashboard to find the key)
Note: Your Adafruit IO Key should be kept in a safe place and treated with the same care as your Adafruit username and password.
Below are the parameters which need to be set in the Arduino source config code.
  #define IO_USERNAME  "account_username"
  #define IO_KEY       "aio_key"
Programming the ESP8266 with sensor information:
- Download the source code from my git repository Smart-Gardening-solution-with-IOT.
- Open Arduino file Smart_Garden_Program.ino using Arduino Software.
- Edit the file config.h with wifi credentials to connect your ESP8266 device to internet service using local wifi connect
#define WLAN_SSID "ssid" // use wifi ssid
#define WLAN_PASS "password" // use wifi password
- Also below parameters that need to be set in the Arduino source code from the Adafruit service.
  #define IO_USERNAME  "account_username"
  #define IO_KEY       "aio_key"
That's it, your ESP8266 is connected to a PC you can compile and upload the program to ESP8266 using a serial connection that is already connected using the USB port.
Once the program uploaded successfully you can remove the USB connection from the PC and connect to the supported power bank. So that you can use the device set up in the garden place.
Now insert your Moisture sensor into the soil near to plant so that it can read the data from the soil. This will help to read the correct moisture from the soil and send the data to ESP8266 more accurately.
Now device program will start collecting the sensor data from the both DHT sensor and Moisture sensor and send to the Adafruit service via MQTT protocol over the internet.
You can go to the Adafruit dashboard to see the data is received from the garden.
https://io.adafruit.com/sonwaneganesh/dashboards/smart-garden
This will show the weather and soil data directly from your garden continuously. which will help in monitor the plant health regularly basic. Additionally, we can trigger the water pump which can be installed with the irrigation system. Once a certain level of moisture level gets down the pump will start a water pump which will irrigate the garden automatically.
That's how we can use technology to grow plants smart way.
Happy Gardening!


No comments:
Post a Comment